
Piriapolis Boatyard Day 7
28/07/11 19:55 Filed in: Uruguay | Maintenance
Cold with rain showers during the morning.
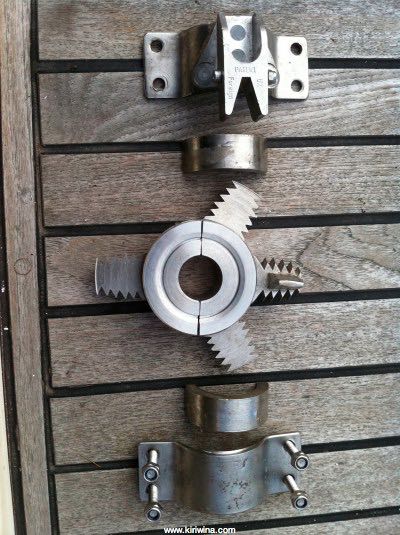
"Stripper" rope cutter cleaned and ready for installation.
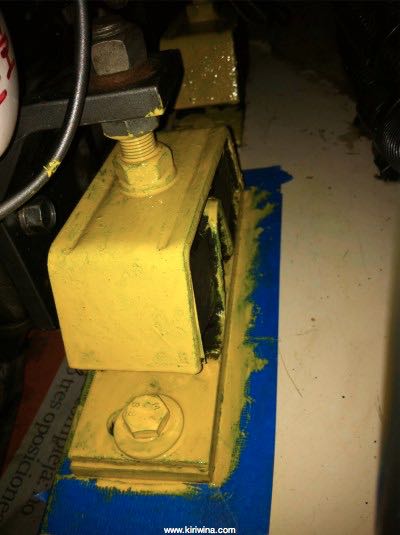
Continued painting the engine mounts.
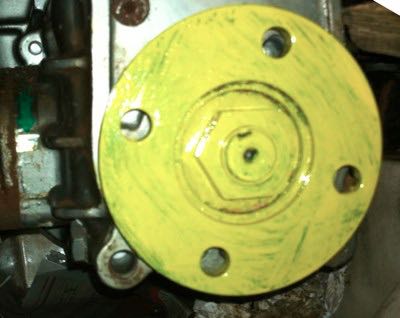
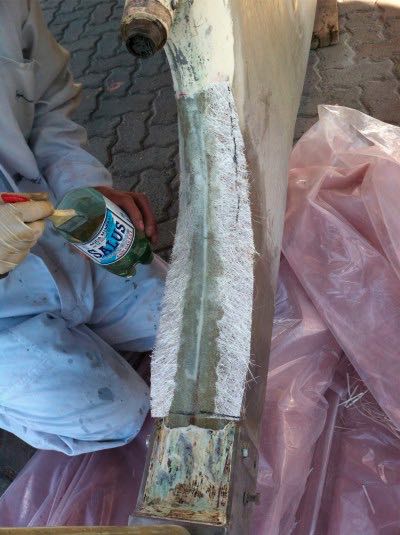
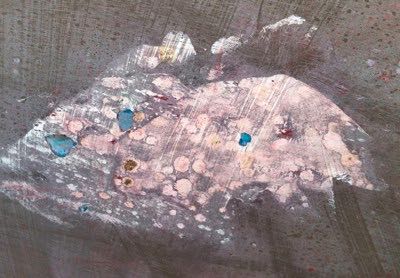
Engine side of the shaft coupling after first coat.
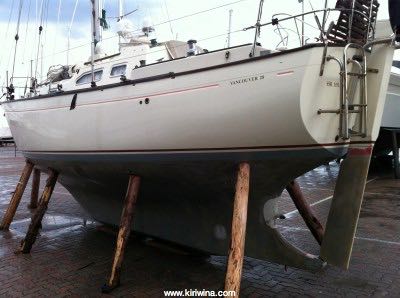
No further work on the hull but the first coat of epoxy has set well.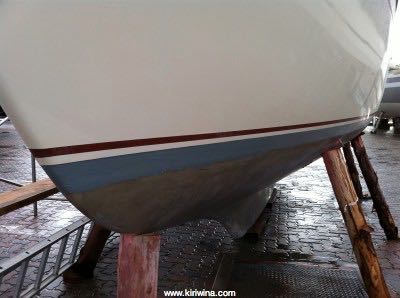
"Stripper" rope cutter cleaned and ready for installation.
Continued painting the engine mounts.
Engine side of the shaft coupling after first coat.
No further work on the hull but the first coat of epoxy has set well.
Piriapolis, Boatyard Day 6
27/07/11 23:24 Filed in: Uruguay | Maintenance
Rapid progress with removing the gelcoat and the first coat of epoxy resin was applied.
I started cleaning up the engine mounts which have become badly corroded. Firstly though, I removed the Yanmar water pump to change the impeller. This particular impeller has done sterling service. Fitted in September 2006 it has done some 800 hours and looked in perfect condition.
One downside of leaving the impeller this long is that it was very difficult to remove. Over two hours with WD40 and gentle levering. In future I'll try to take advantage of impeller longevity but remove and inspect at much shorter intervals.
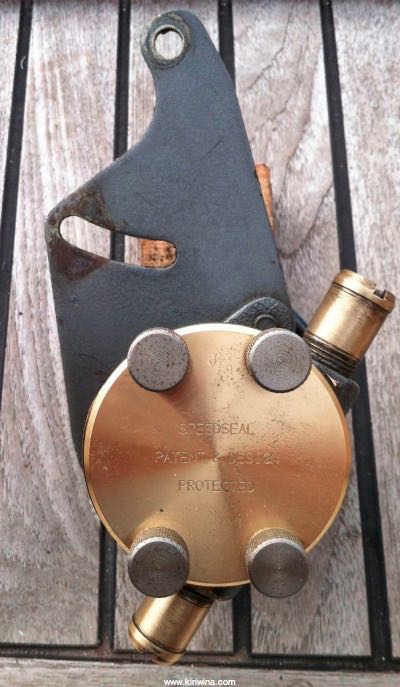
Meantime I fitted an upgraded water pump Speedseal with run-dry option.

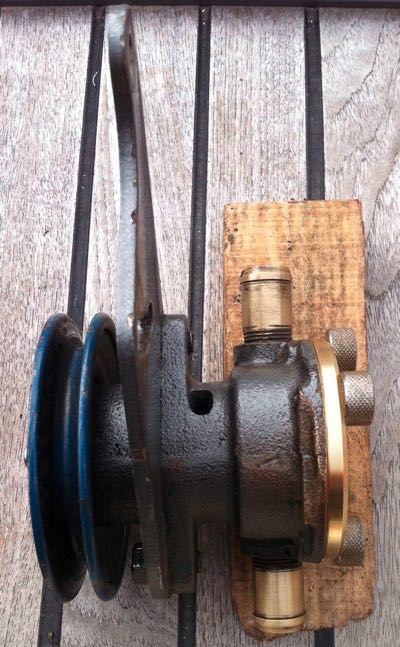
I started cleaning up the engine mounts which have become badly corroded. Firstly though, I removed the Yanmar water pump to change the impeller. This particular impeller has done sterling service. Fitted in September 2006 it has done some 800 hours and looked in perfect condition.
One downside of leaving the impeller this long is that it was very difficult to remove. Over two hours with WD40 and gentle levering. In future I'll try to take advantage of impeller longevity but remove and inspect at much shorter intervals.
Meantime I fitted an upgraded water pump Speedseal with run-dry option.
Piriapolis, Boatyard Day 5
26/07/11 23:24 Filed in: Uruguay | Maintenance
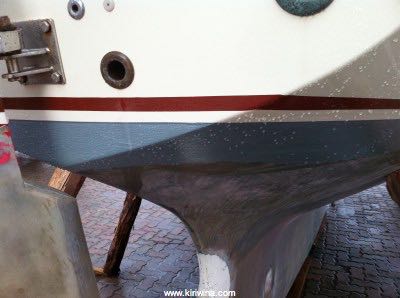
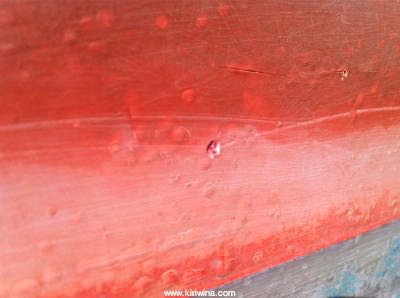
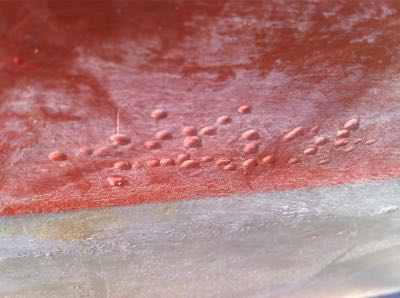
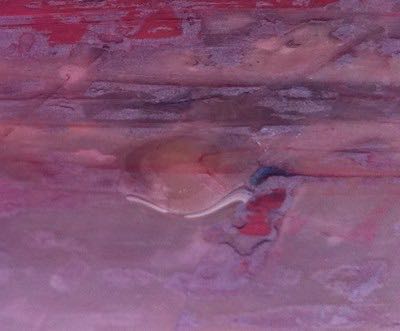
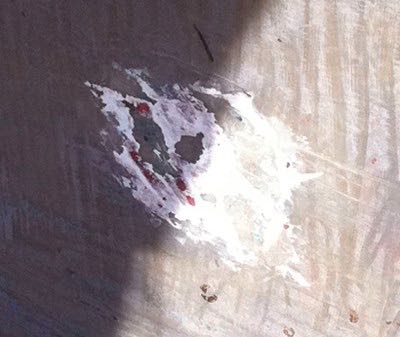
Bad news day today. The blisters we noted on day two are more serious.
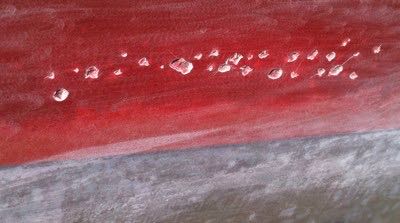
What seems to have happened is that water has penetrated the red waterline gelcoat. This gelcoat contains a large number of air pockets which fill with water. A reaction takes place and bubbles form in the gelcoat. When pricked some of these bubbles still contained water though many were dry. Fortunately none had penetrated the laminate.
There are a number of causes. A fully kitted cruising yacht will lie lower in the water submerging much of the red gelcoat. Poorly applied gelcoat allowing air pockets to form, red gelcoat being inherently weaker and more prone to UV damage and Kiriwina navigating in warmer waters for much of the past 4 years.
What to do? Leave it, sand down blisters, fill and paint or solve the problem. Solving the problem means grinding back all the waterline red gelcoat, building up with epoxy resin and finishing with epoxy filler. I chose to solve the problem.
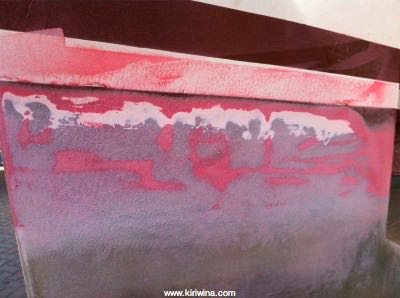
Thereafter the water line will be raised by the width of the red gelcoat and anti fouled in the usual way.
Laurence cracked on rapidly and by nightfall half the red gelcoat had been ground away.
Repairs to the aft keel were completed but water is still dripping out. Seacocks reinstalled.
What seems to have happened is that water has penetrated the red waterline gelcoat. This gelcoat contains a large number of air pockets which fill with water. A reaction takes place and bubbles form in the gelcoat. When pricked some of these bubbles still contained water though many were dry. Fortunately none had penetrated the laminate.
There are a number of causes. A fully kitted cruising yacht will lie lower in the water submerging much of the red gelcoat. Poorly applied gelcoat allowing air pockets to form, red gelcoat being inherently weaker and more prone to UV damage and Kiriwina navigating in warmer waters for much of the past 4 years.
What to do? Leave it, sand down blisters, fill and paint or solve the problem. Solving the problem means grinding back all the waterline red gelcoat, building up with epoxy resin and finishing with epoxy filler. I chose to solve the problem.
Thereafter the water line will be raised by the width of the red gelcoat and anti fouled in the usual way.
Laurence cracked on rapidly and by nightfall half the red gelcoat had been ground away.
Repairs to the aft keel were completed but water is still dripping out. Seacocks reinstalled.
Piriapolis, Boatyard Day 4
25/07/11 23:52 Filed in: Uruguay | Maintenance
Strong winds today. Up to 30 knots with heavy rain forecast later tonight. With this amount of wind the rudder was banging against the Aires frame and had to be lashed.
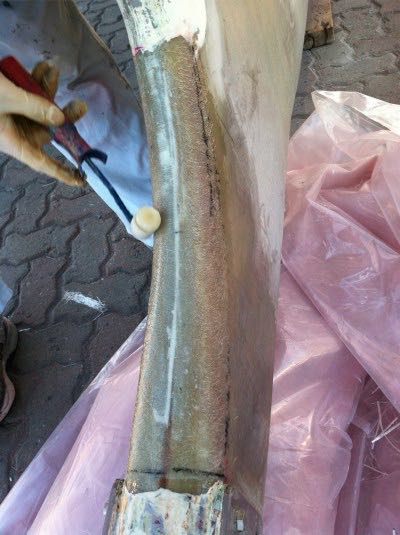
No work on the hull today. Both Blakes seacocks were polished and the through hulls cleaned ready for greasing and reassembly. The shaft coupling received a fourth and final coat of paint.
In the morning acidy water was still slowly dripping from the hole drilled in the underside of the keel just forward of the rudder. By later afternoon it had stopped. Whether this is due to all the water having drained out or the drying effect of strong warm winds I am not sure.
Piriapolis, Boatyard Day 3
24/07/11 23:51 Filed in: Uruguay | Maintenance
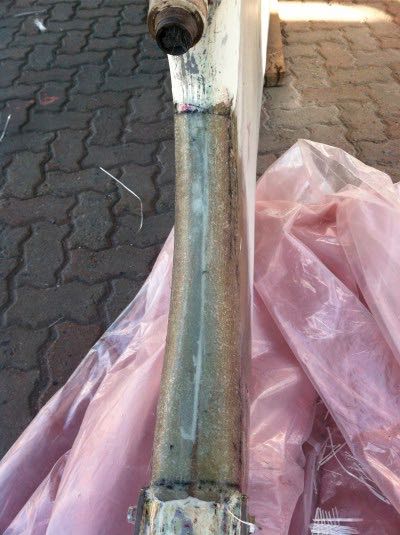
Third coat on the shaft coupling.
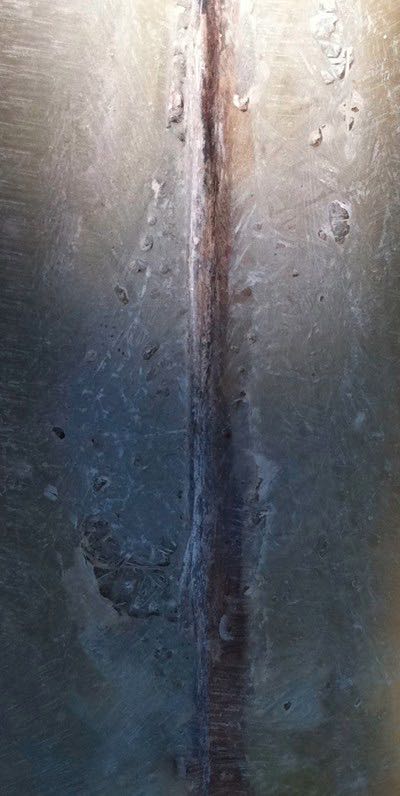
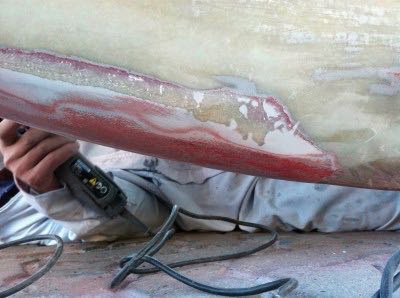
Work began on the aft end of the keel. I suspect, but cannot know for sure, that this problem arose as a result of less than optimum work when Kiriwina was built. The aft end of the keel appears to comprise two vertical sections glued/bonded together with a robust end cap incorporating the rudder heel.
The bonding process appears not to be complete with a hairline gap allowing water into the keel. There is evidence of filler being used to smooth irregularities in the join.
Firstly, to see exactly what we were dealing with, the crack was opened up a little with a grinder and then washed with acetone. Ideally the boat would be left ashore until the damaged area was completely dry before attempting repairs. This was not possible.
The repair plan involves an area around the crack being ground down to a dept of 2-3mm. Then resin/silica filler will be applied to the crack giving a good bonding surface,
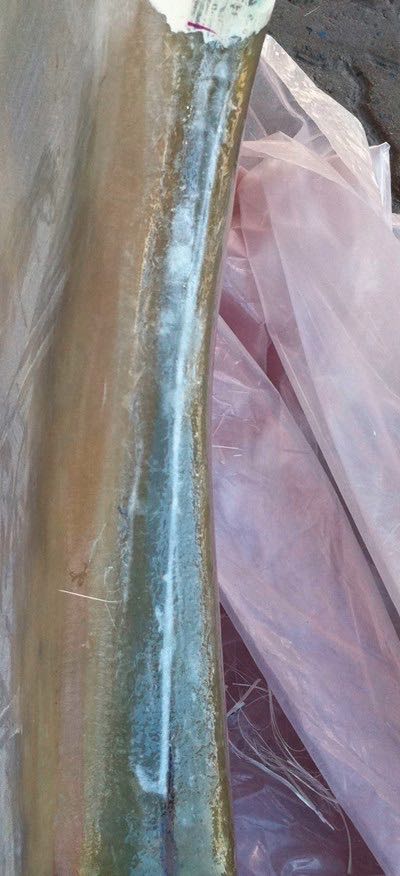
for three layers of fibreglass, mat/woven/mat bound by epoxy resin.
All done! The work took a couple of hours.
This repair is intended to seal and bind the crack. While it appears that the problem is stable any sign of the crack spreading into the new material will indicate otherwise. Before launch the two drain holes drilled into the underside of the keel will be filled with epoxy and sealed. With no more water getting in any residual water can be allowed to drain by drilling the epoxy next time Kiriwina is hauled out.
Later a repair from 2006 was found to have been poorly done with an excess of filler applied on top of antifouling.
Polishing continued on the starboard side and was completed by the end of the day.
Work began on the aft end of the keel. I suspect, but cannot know for sure, that this problem arose as a result of less than optimum work when Kiriwina was built. The aft end of the keel appears to comprise two vertical sections glued/bonded together with a robust end cap incorporating the rudder heel.
The bonding process appears not to be complete with a hairline gap allowing water into the keel. There is evidence of filler being used to smooth irregularities in the join.
Firstly, to see exactly what we were dealing with, the crack was opened up a little with a grinder and then washed with acetone. Ideally the boat would be left ashore until the damaged area was completely dry before attempting repairs. This was not possible.
The repair plan involves an area around the crack being ground down to a dept of 2-3mm. Then resin/silica filler will be applied to the crack giving a good bonding surface,
for three layers of fibreglass, mat/woven/mat bound by epoxy resin.
All done! The work took a couple of hours.
This repair is intended to seal and bind the crack. While it appears that the problem is stable any sign of the crack spreading into the new material will indicate otherwise. Before launch the two drain holes drilled into the underside of the keel will be filled with epoxy and sealed. With no more water getting in any residual water can be allowed to drain by drilling the epoxy next time Kiriwina is hauled out.
Later a repair from 2006 was found to have been poorly done with an excess of filler applied on top of antifouling.
Polishing continued on the starboard side and was completed by the end of the day.
Piriapolis, Boatyard Day 2
23/07/11 23:50 Filed in: Uruguay | Maintenance
Another fine and sunny day began with a second coat on the shaft coupling. Waxing and polishing was begun on the port topsides.
A closer examination of the now stripped hull revealed a number of hopefully small problems. Our mission creep has started.
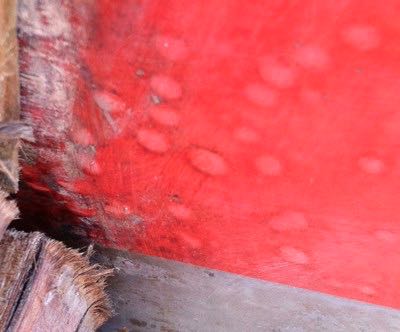
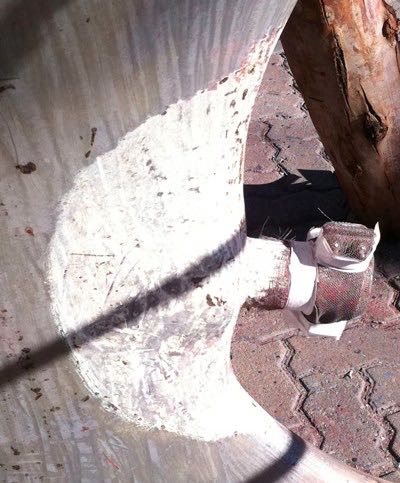
With Kiriwina being loaded down with cruising gear her waterline has moved up some 2-3 centimetres. This meant her red gelcoat coach line has been partially submerged. With red gelcoat being more porous than cream, water has penetrated and small blisters have appeared on the rudder and along the hull. I hope that these have formed only under the red gelcoat and water has not gone deeper.
Kiriwina was last hauled out and antifouled in December 2007. At that time I noticed an imperfection at the aft end of the keel. It seemed ok and I did not investigate further.
This time, with all the paint removed it was obvious there was a fine crack in the keel which was allowing water to enter the structure.
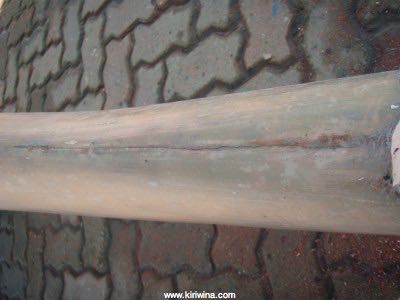
After more than two months ashore there was still a slight water seepage from underneath the keel.
A closer examination of the now stripped hull revealed a number of hopefully small problems. Our mission creep has started.
With Kiriwina being loaded down with cruising gear her waterline has moved up some 2-3 centimetres. This meant her red gelcoat coach line has been partially submerged. With red gelcoat being more porous than cream, water has penetrated and small blisters have appeared on the rudder and along the hull. I hope that these have formed only under the red gelcoat and water has not gone deeper.
Kiriwina was last hauled out and antifouled in December 2007. At that time I noticed an imperfection at the aft end of the keel. It seemed ok and I did not investigate further.
This time, with all the paint removed it was obvious there was a fine crack in the keel which was allowing water to enter the structure.
After more than two months ashore there was still a slight water seepage from underneath the keel.
Piriapolis, Boatyard Day 1
22/07/11 23:49 Filed in: Uruguay | Maintenance
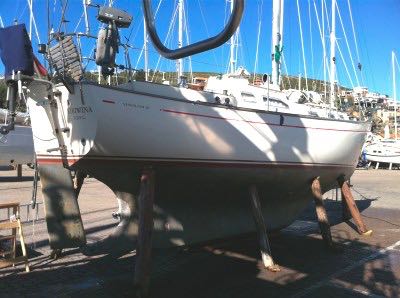
I was down at the yard by 09:30. There is quite a lot to do before our target launch date of Friday 5th August. Major work is being carried out by local contractors, Imperial Yachts.
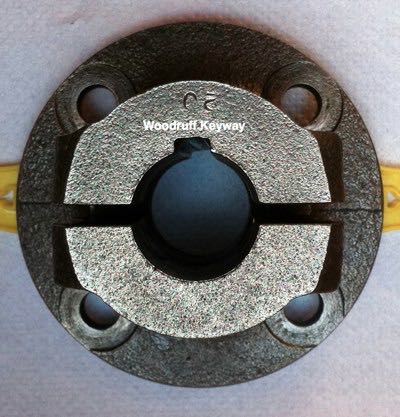
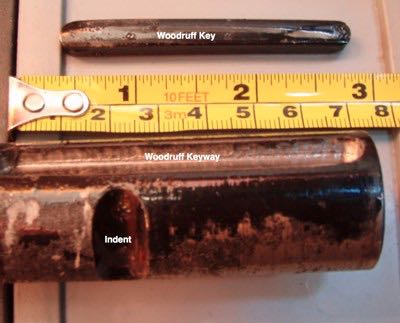
The shaft coupling, nicely shot blasted, was back on board having been modified to ABYC (American Boat and Yacht Council) standards. At build the shaft was secured within the coupling by four allen bolts and a rolled pin locating in an indent on the shaft.
After the first failure, in 2006, a grub screw was added and a new rolled pin fitted by a Yanmar dealer in Dartmouth. This, I was assured, would solve the problem.
It did until December 2010 when the coupling failed again. My temporary repair held until April this year in Piriapolis.
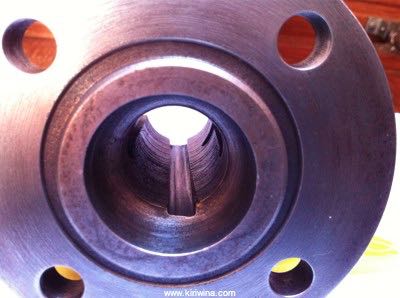
A proper analysis revealed that the rolled pin and indent barely matched. Only a small part of the pin diameter was locating in the indent. Modifications included properly matching the pin and indent and machining a woodruff keyway in the shaft and coupling. The shaft was tested and found to be true.
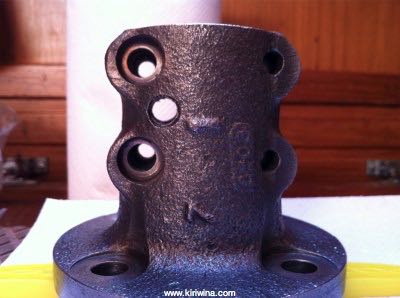
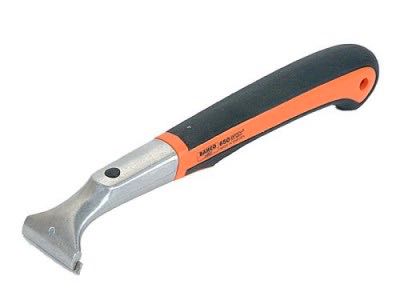
I applied the first of four coats of paint to the shaft coupling. Laurence and Elisa made excellent progress stripping the below waterline hull back to the gelcoat. They were using Bahco 650 Ergo scrapers and were finished by the end of the day.
I was extremely impressed with the Bahco 650 scrapers.
I had not seen Kiriwina stripped back to gelcoat. The hull was in excellent condition although I was surprised to see a number of somewhat agricultural examples of GRP work most likely dating from when she was built.
The shaft coupling, nicely shot blasted, was back on board having been modified to ABYC (American Boat and Yacht Council) standards. At build the shaft was secured within the coupling by four allen bolts and a rolled pin locating in an indent on the shaft.
After the first failure, in 2006, a grub screw was added and a new rolled pin fitted by a Yanmar dealer in Dartmouth. This, I was assured, would solve the problem.
It did until December 2010 when the coupling failed again. My temporary repair held until April this year in Piriapolis.
A proper analysis revealed that the rolled pin and indent barely matched. Only a small part of the pin diameter was locating in the indent. Modifications included properly matching the pin and indent and machining a woodruff keyway in the shaft and coupling. The shaft was tested and found to be true.
I applied the first of four coats of paint to the shaft coupling. Laurence and Elisa made excellent progress stripping the below waterline hull back to the gelcoat. They were using Bahco 650 Ergo scrapers and were finished by the end of the day.
I was extremely impressed with the Bahco 650 scrapers.
I had not seen Kiriwina stripped back to gelcoat. The hull was in excellent condition although I was surprised to see a number of somewhat agricultural examples of GRP work most likely dating from when she was built.
Back to Piriapolis
21/07/11 23:48 Filed in: Uruguay
Punta del Este to Buenos Aires
10/07/11 15:37 Filed in: Uruguay